Your signup count can rise while MRR stays flat, and the reason is almost always buried in one specific stage of the funnel, not the funnel as a whole. This guide is about finding that stage: breaking signup-to-MRR into its individual steps (activation, trial, paid conversion) and measuring the drop-off between each one, with GA4, GTM, and billing data doing the instrumentation.
Table of Contents
- Step 1: Define the Signup-to-MRR Measurement Model
- Step 2: Track Signups and Paid Conversions with GA4 and GTM
- Step 3: Connect Paying Customers Back to Their Original Source
- Step 4: Calculate Conversion Rates, CAC, and Channel ROI
- Step 5: Find Revenue Leaks with Dashboards and Automated Attribution
- FAQ
- Conclusion
Step 1: Define the Signup-to-MRR Measurement Model
Good signup to MRR conversion tracking starts with a clear measurement model. Write down the exact events you want to connect before you add tags or build charts.
Your basic path should look like this:
- Acquisition source, such as organic search, a paid ad, or a referral
- Visitor
- Completed signup
- Activated account or trial user
- Paying customer
- New MRR
- Later expansion, contraction, reactivation, or churn
Define signup as a completed account event, not a button click. A click can happen when a form fails validation. The completed event should fire only after your app has made the account.
Then define paid conversion. Use the first successful paid subscription or invoice that meets your billing rules. Keep trial users separate from paying subscribers. A trial signup belongs in the denominator. It should not count as MRR until a paid subscription begins.
For example, imagine 500 trial signups in a month. If 40 later start plans worth $2,000 in combined MRR, the signup-to-MRR view is more useful than a signup count alone. You can report 8% trial-to-paid conversion, $2,000 in new MRR, and $50 in new MRR per converted account.
Set a time rule too. A signup from the last three days may not have had time to convert. Comparing it with older signups will make the rate look worse than it is.
Document the event name, timestamp, user ID, email or customer key, source fields, plan, and recurring amount. The timestamp rule matters most. Align the signup date with the first paid invoice date, or your cohort report will mix different user groups.
The funnel-planning reference can help you think through the stages and formulas, but your billing records must remain the source for paid revenue.
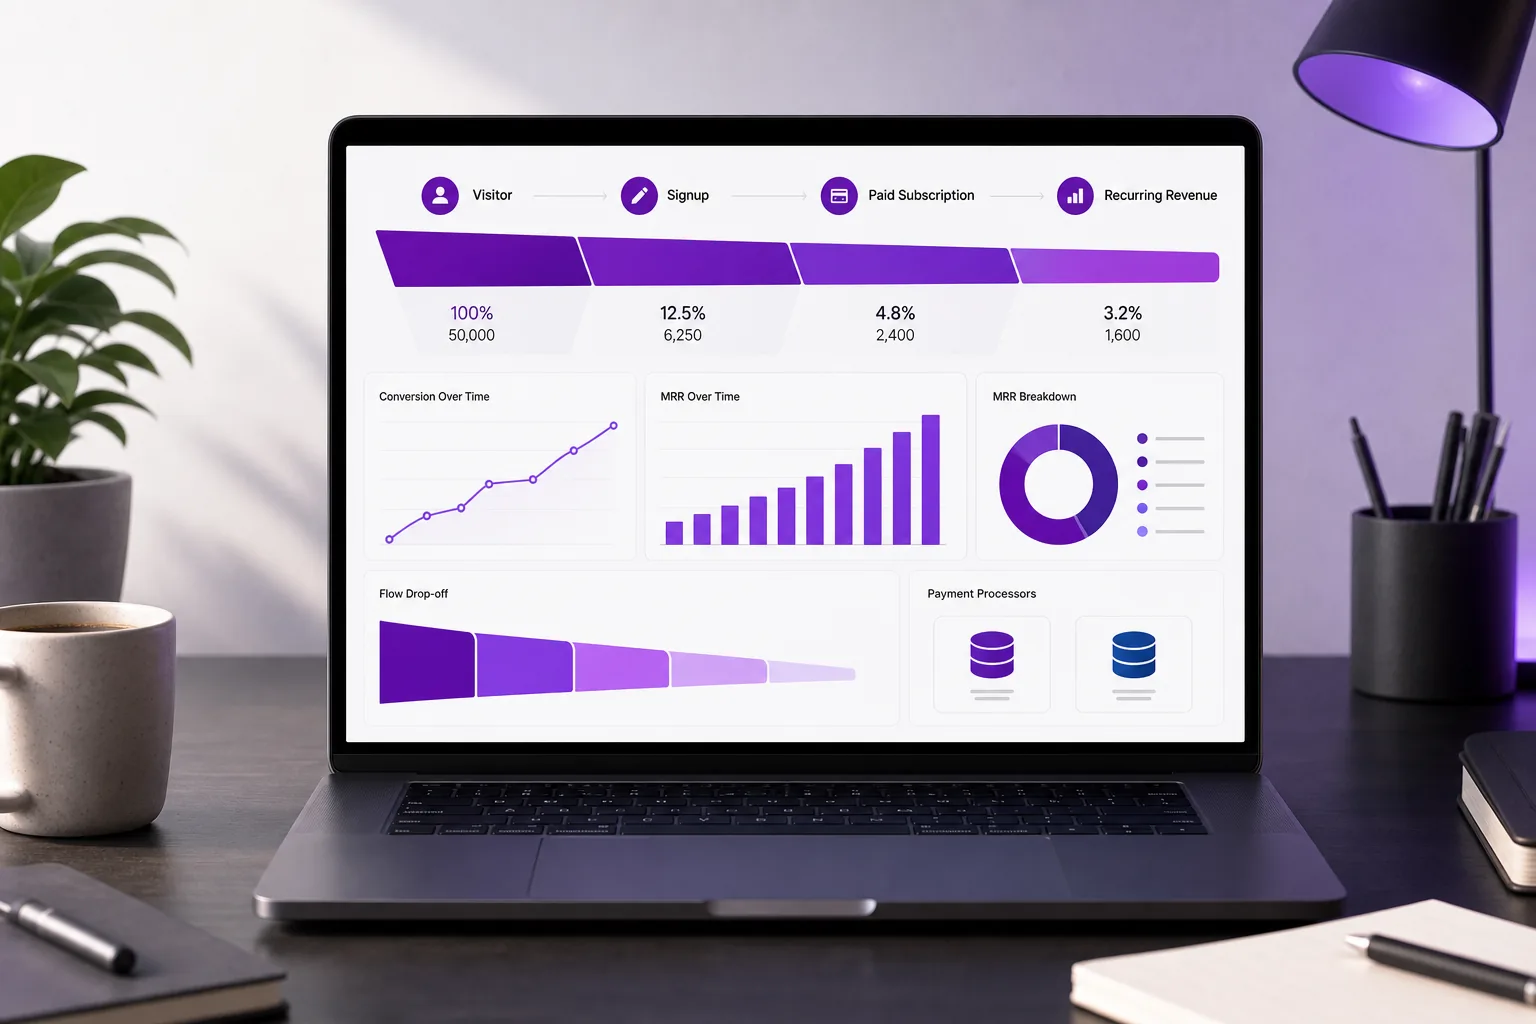
Milestone: You should now have one written event map and one rule for when a signup becomes a paid customer.
Step 2: Track Signups and Paid Conversions with GA4 and GTM
GA4 and Google Tag Manager can capture the web events behind signup to MRR conversion tracking. They can't replace your billing system. They record the journey that leads into it.
Start by turning off automatic form interaction tracking when it produces noisy data. Generic form tracking can count failed submissions as completed forms. It may also fire on forms that have different business goals.
In GTM, enable the built-in form variables. Create a GA4 event for the successful signup. A name such assignup_completeis clearer than a vague name such asform_submit. Add useful parameters, such as the page path, plan selected, and signup method.
Use the form ID or a custom data-layer value to target the right form. If your site has a newsletter form and a product signup form, tracking all forms as one event will inflate your conversion count.
Test the event in GTM preview mode. Submit a valid form. Then submit an invalid form. The first should fire the signup event. The second should not.
Mark the validated GA4 event as a key event after it appears in your property. Google notes that event data can take time to appear in reports, so use real-time checks and test records before judging a campaign.
Event documentation can help clarify the event model and naming approach. Keep your event names stable. Changing them mid-quarter makes trend reports hard to trust.
For a lean setup, you can store a first-party visitor or campaign ID with the signup record. You don't need a large data warehouse on day one. You do need one persistent key that later connects the account to its billing customer.
For paid conversions, fire a separate event only after the payment state is confirmed. A pricing-page click is not a paid conversion. A checkout start is not MRR. Your app or server should confirm the active subscription before sending the paid event.
Milestone: You should now see clean signup events in GA4 and a separate paid event tied to a known account.
Step 3: Connect Paying Customers Back to Their Original Source
Signup to MRR conversion tracking becomes useful when a paying customer still carries the source that brought them in. Without that link, you can count revenue but can't judge channel quality.
Capture UTM values and ad click IDs on the first visit. Store them with a first-party cookie or server-side session record. Keep first-touch data separate from last-touch data. A user might first find you through search, then return through an email link before paying.
At signup, copy the stored source fields into your user or account record. The key fields often include source, medium, campaign, referrer, landing page, and click ID. If signup runs on another subdomain, test that the identifier survives the move.
Next, map your application user to the billing customer. Email can work for a small product, but a stable internal customer ID is safer. Store that ID in both your app and billing system.
When payment arrives days later, join the paid record to the original signup. For ad platforms, you can send an offline conversion with the original click ID. This helps the ad system learn from paid customers instead of optimizing only for cheap trials.
Server-side tracking can help when browsers block scripts or limit cookie storage. It also gives your team a better place to validate payment status. Still, it doesn't remove consent duties. Collect only the data you need and respect your consent settings before sending marketing events.
For ultra-lean teams, a campaign spreadsheet can work as a temporary audit layer. Record the tagged URL, signup count, paid count, MRR, and date range. It won't update by itself, but it can expose broken source capture before you invest in automation.
A cohort of 400 trial signups that produces 30 paying customers is a very different stage-by-stage story than a cohort of 400 that produces 30 paying customers after losing 350 at activation and only 20 at the trial-to-paid step — same ending number, completely different fix. Judge each cohort by where in the chain it loses people, not by the final conversion rate alone.
Chartsy Growth is built for this join. It connects website acquisition data with Stripe or Paddle records, then breaks out customers, MRR, revenue, and churn by source. The Chartsy Growth setup guide explains how to connect the site and billing data.
Step 4: Calculate Conversion Rates, CAC, and Channel ROI
Use separate formulas for signup conversion, paid conversion, CAC, and revenue return. Combining them into one rate hides where the funnel fails.
Start with these measures:
- Signup rate: completed signups divided by qualified visitors.
- Trial-to-paid rate: new paying customers divided by trial signups.
- Signup-to-MRR: new MRR from a signup cohort divided by total signups in that cohort.
- CAC: channel spend divided by new paying customers from that channel.
- MRR per signup: new MRR from the cohort divided by its signups.
For CAC, include the cost that belongs to the channel and time period. Paid media is easy to count. Founder time, sponsorships, agency work, and content cost need a stated rule. If you leave those out, compare channels with a note that the CAC is media-only.
Let's say a campaign costs $1,000 and produces 20 paid customers. Its CAC is $50. If those customers add new MRR, divide that MRR by 20 to calculate average new MRR per customer. That doesn't prove the campaign failed. You still need retention, gross margin, payback, and later expansion. But it does tell you whether the first-month recurring value is below acquisition cost.
Review channels at the same funnel age. A new campaign may have strong signups but no paid customers yet. Give it a defined conversion window, then compare mature cohorts with mature cohorts.
Track customer churn by source too. One channel may produce low-cost customers who cancel quickly. Another may produce fewer accounts with higher ARPU and better retention. The second channel may deserve more attention even if its first signup rate is lower.
Don't treat click-through rate as ROI. Clicks can explain reach. New MRR and retained revenue explain business value.
Step 5: Find Revenue Leaks with Dashboards and Automated Attribution
A dashboard should show where the signup-to-MRR chain breaks. It should help you move from a number to a next action.
Build one view with these columns:
- Source and campaign
- Visitors
- Signups
- Activated accounts
- Paid customers
- New MRR
- Churned MRR
- Net MRR
- Retention or churn rate
Use the view to ask focused questions. If visitors are high but signups are low, inspect the landing page and form. If signups are high but activation is low, walk through onboarding. If activation is healthy but paid conversion is weak, review pricing, trial prompts, and payment friction.
This is where a qualitative audit helps. Walk the signup flow as a new user. Check the first email, product handoff, empty states, and payment step. A dashboard can show a drop. A user-flow review can show that the next action is unclear.
Onboarding email is part of this measurement chain. Review the onboarding email flow as a separate test area, then compare the result against a defined cohort.
Automate the joins once the model works by hand. A workflow can pass a signup event to your database, attach the source key, and update the account when billing confirms payment. The exact tool matters less than the data contract. Every system must agree on the account ID and event times.
Chartsy can reduce the reporting work for teams using Stripe or Paddle. Its analytics platform turns connected subscription records into charts and dashboards, while natural-language questions can help a founder inspect MRR, churn, ARPU, failed payments, or source-level revenue without writing SQL.

Set a review rhythm that fits the data. Check signup tracking during a campaign. Review paid conversion after the cohort has had time to mature. Review churn later, because retention needs a longer window.
Decision rule: never pause a channel because traffic is weak alone. Pause it when the source fails to produce the customer or revenue outcome you set at the start.
FAQ
What is signup to MRR conversion tracking?
Signup to MRR conversion tracking connects a new account with the recurring revenue it later produces. It starts with a signup event, then matches that account to a paid subscription in your billing system. The result shows which signups become customers and how much new MRR each cohort adds.
How do I track signup to paid conversion in GA4?
Track a validated signup event in GA4, then track payment confirmation as a separate event. Use Google Tag Manager to fire the signup event only after the account is made. Keep the paid event tied to an account ID, because GA4 alone won't know if a trial becomes an active subscriber.
How do I connect signups to Stripe or Paddle revenue?
Store a stable user or customer ID when the signup happens, then match it to the billing customer in Stripe or Paddle. Use the first successful paid subscription as the conversion point. A subscription analytics tool such as Chartsy can use that connection to show MRR, revenue, and churn by acquisition source.
What is the formula for signup-to-MRR conversion?
Divide new MRR from a signup cohort by the total signups in that cohort. You can also report paid conversion separately by dividing new paying customers by signups. Keep the cohort date and conversion window fixed, since recent signups have had less time to become paid customers.
How do I calculate CAC for a SaaS channel?
Calculate CAC by dividing channel acquisition cost by the number of new paying customers from that channel. State what costs you include. Then compare CAC with new MRR, gross margin, payback time, and retention. A low signup cost means little if the source produces few paid accounts.
Conclusion
Start with one clean signup event, one stable customer ID, and a billing match that confirms payment. Then connect your source data to Stripe or Paddle and review each cohort by paid customers, MRR, and churn. If you want fewer manual joins, connect Chartsy and build the first revenue-by-source dashboard around one channel decision.

Written by
Chartsy TeamAnalytics team at Chartsy
The Chartsy Team writes guides, product updates, and resources to help SaaS and eCommerce founders make sense of their metrics, without SQL or spreadsheets.
Chartsy